Dear friends,
Sunday, 25 June 2017
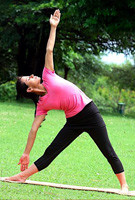
How to do the Trikonasana (Triangle Pose)

- Stand straight. Separate your feet comfortably wide apart (about 31/2 to 4 feet).
- Turn your right foot out 90 degrees and left foot in by 15 degrees.
- Now align the center of your right heel with the center of your arch of left foot.
- Ensure that your feet are pressing the ground and the weight of your body is equally balanced on both the feet.
- Inhale deeply and as you exhale, bend your body to the right, downward from the hips, keeping the waist straight, allowing your left hand to come up in the air while your right hand comes down towards floor. Keep both arms in straight line.
- Rest your right hand on your shin, ankle, or the floor outside your right foot, whatever is possible without distorting the sides of the waist. Stretch your left arm toward the ceiling, in line with the tops of your shoulders. Keep your head in a neutral position or turn it to the left, eyes gazing softly at the left palm.
- Ascertain that your body is bent sideways and not backward or forward. Pelvis and chest are wide open.
- Stretch maximum and be steady. Keep taking in long deep breaths. With each exhalation, relax the body more and more. Just be with the body and the breath.
- As you inhale, come up, bring your arms down to your sides, and straighten your feet.
- Repeat the same on the other side.
5 benefits of the Trikonasana
- Strengthens the legs, knees, ankles, arms and chest
- Stretches and opens the hips, groins, hamstrings, calves, shoulders, chest and spine
- Increases mental and physical equilibrium
- Helps improve digestion
- Reduces anxiety, stress, back pain and sciatica
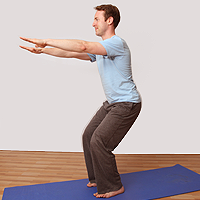
Steps to Chair Pose / Utkatasana
- Stand erect with your feet slightly apart.
- Stretch your hands to the front with palms facing downwards. Do not bend your elbows.
- Bend the knees and gently push your pelvis down as if you are sitting in an imaginary chair.
- Be comfortable or at least try to be! To get a better feel of the Chair Pose, imagine reading a newspaper or typing on a laptop as you remain seated.
- Ensure that you keep your hands parallel to the ground.
- With awareness, sit straight and lengthen your spine. Relax.
- Keep breathing and flip through the pages of the newspaper, enjoying national and international news.

- Sink deeper into the chair by gradually going down but ensure that your knees don’t go beyond your toes.
- Keep going down slowly and then sit down in Sukhasana (cross-legged posture). If you want, you may lie down on your back and relax.
Tip from Sri Sri Yoga expert: Smile throughout. It will help you to hold the posture longer. It is a good idea to do the Chair Pose after you have finished all the other standing yoga postures. You can then start with the sitting yoga postures or the lying down yoga postures.
Benefits of Utkatasana / Chair Pose
- Exercises the spine, hips and chest muscles
- Helps strengthen the lower back and torso
- Tones the thigh, ankle, leg and knee muscles
- Balances the body and brings determination in the mind
Wednesday, 14 June 2017
YOGA
“Yoga is not just exercise and asanas. It
is the emotional integration and spiritual elevation with a touch of mystic
element, which gives you a glimpse of something beyond all imagination.”
TYPES OF YOGA
KARMA YOGA-
path of blissful action
Standing Forward Bend (Hastapadasana)
Hasta- hand; Padah- foot; asana- pose
Pronounced: Has-tah-pada-sanah
Pronounced: Has-tah-pada-sanah
How to do Standing Forward Bend (Hastapadasana)
- Stand
straight with feet together and arms alongside the body.
- Balance
your weight equally on both feet.
- Breathing
in, extend your arms overhead.
- Breathing
out, bend forward and down towards the feet.
- Stay
in the posture for 20-30 seconds and continue to breath deeply.
- Keep
the legs and spine erect; hands rest either on the floor, beside the feet
or on the legs.
- On the
out breath, move the chest towards the knees; lift the hips and tailbone
higher; press the heels down; let the head relax and move it gently
towards the feet. Keep breathing deeply.
- Breathing
in, stretch your arms forward and up, slowly come up to the standing
position.
- Breathing
out, bring the arms to the sides.
Benefits of the Standing Forward Bend (Hastapadasana)
- Stretches
all the muscles of the back of the body.
- Invigorates
the nervous system by increasing the -blood supply.
- Makes
the spine supple.
- Tones
the abdominal organs.
Contraindications of the Standing Forward Bend
(Hastapadasana)
Back injury: People suffering from lower back injuries,
Spondylitis, Cervical pain or any kind of back and spinal problems should not
do this pose.
Tree Pose - Vrikshasana

Vriksha - Tree; Asana - Pose
The asana is pronounced as VRIK-shAH-sana
This posture replicates the graceful, steady stance of a
tree. Unlike most yoga poses, the Tree Pose requires keeping our eyes open in
order to maintain body balance.
How to do the Tree Pose (Vrikshasana)
- Stand
tall and straight with arms by the side of your body.
- Bend
your right knee and place the right foot high up on your left thigh. The
sole of the foot should be placed flat and firmly near the root of the
thigh.
- Make
sure that your left leg is straight. Find your balance.
- Once
you are well balanced, take a deep breath in, gracefully raise your arms
over your head from the side, and bring your palms together in ‘Namaste’
mudra (hands-folded position).
- Look
straight ahead in front of you, at a distant object. A steady gaze helps
maintain a steady balance.
- Ensure
that your spine is straight. Your entire body should be taut, like a
stretched elastic band. Keep taking in long deep breaths. With each
exhalation, relax the body more and more. Just be with the body and the
breath with a gentle smile on your face.
- With
slow exhalation, gently bring down your hands from the sides. You may
gently release the right leg.
- Stand tall and straight as you did at the beginning of the posture. Repeat this pose with the left leg off the ground on the right thigh.
Benefits of the Vrikshasana / Tree Pose
- This
pose leaves you in a state of rejuvenation. It stretches the legs, back
and arms, and invigorates you.
- It
brings balance and equilibrium to your mind.
- It
helps improve concentration.
- This
posture has been found to relieve some cases of sciatica.
- It
makes the legs strong, improves balance, and opens the hips.
- Helps
those who are suffering from sciatica.
Contraindications of the Tree Pose (Vrikshasana)
Avoid doing this posture if you are suffering from migraine,
insomnia, low or high blood pressure (those with high blood pressure may do
this pose but without raising their hands overhead, as this may further raise
their blood pressure).
Trikonaasana
- Pose
The asana is pronounced as Tree-kone-nah -sah-nah
Unlike most yoga postures, the Triangle Pose requires
keeping the eyes open in order to maintain body balance.
How to do the Trikonasana (Triangle Pose)
- Stand
straight. Separate your feet comfortably wide apart (about 31/2 to 4
feet).
- Turn
your right foot out 90 degrees and left foot in by 15 degrees.
- Now
align the center of your right heel with the center of your arch of left
foot.
- Ensure
that your feet are pressing the ground and the weight of your body is
equally balanced on both the feet.
- Inhale
deeply and as you exhale, bend your body to the right, downward from the
hips, keeping the waist straight, allowing your left hand to come up in
the air while your right hand comes down towards floor. Keep both arms in
straight line.
- Rest
your right hand on your shin, ankle, or the floor outside your right foot,
whatever is possible without distorting the sides of the waist. Stretch
your left arm toward the ceiling, in line with the tops of your shoulders.
Keep your head in a neutral position or turn it to the left, eyes gazing
softly at the left palm.
- Ascertain
that your body is bent sideways and not backward or forward. Pelvis and
chest are wide open.
- Stretch
maximum and be steady. Keep taking in long deep breaths. With each
exhalation, relax the body more and more. Just be with the body and the
breath.
- As you
inhale, come up, bring your arms down to your sides, and straighten your
feet.
- Repeat
the same on the other side.
Tips to do Trikonasana
- Make
sure you have done a good warm up exercise of the whole body before you do
the asana.
- While
bending forward do it slowly and gently so as not to lose balance.
5 benefits of the Trikonasana
- Strengthens
the legs, knees, ankles, arms and chest
- Stretches
and opens the hips, groins, hamstrings, calves, shoulders, chest and spine
- Increases
mental and physical equilibrium
- Helps
improve digestion
- Reduces
anxiety, stress, back pain and sciatica
Contraindications of the Trikonasana
Avoid doing this pose if you are suffering from migraine,
diarrhea, low or high blood pressure, or neck and back injuries. Those with
high blood pressure may do this pose but without raising their hand overhead,
as this may further raise the blood pressure.
Subscribe to:
Comments (Atom)